Saturday, September 25, 2010

French Foliage

I already showed you this first card....... Even though I made it for my Brother's birday and liked it so well we made it in my clubs for September.
During the class when we were talking about how real these leaves look, it occurred to me that these would really be pretty using the "rock and roll" technique.


Aren't these leaves gorgeous???? I first stamped the leaf in Old Olive, then rocked it in Cherry Cobbler and a litte More Mustard for a really good fall look. I really liked how this turned out. I repeated the image all over the piece of Confetti Cream cardstock and then added the water drop look with Crumb Classic stamp pad. On the bottom of the card I attached some of the Autumn Spice designer series paper and attached a piece of Cajun Craze punched using the Scallop Edge Border Punch. Then I tied some 5/8" Old Olive Grosgrain ribbon in a knot.
The greeting comes from the Afterthoughts Hostess stamp set and punched out with the Scallop Oval Punch. I punched another oval from Cajun Craze, cut it in half lengthwise and attached to the greeting for some interest.


Have a Beautiful Day!!

Friday, September 24, 2010

Cased Birthday Card

Unfortunately, I made this card a while ago for my sister's birthday that is this coming Sunday....... and I don't remember when I saw it!!! If it's yours, please let me know and I will give you credit.

I thought this was so cute...... My card base is Whisper White and I attached two pieces of black and white paper from the Love Letter designer series paper. The top piece is rounded on the corners and "set up on dimensionals". Very unique; something I haven't done before. The bottom layer is also rounded on the bottom corners, but this piece is adhered to the card base. The ribbon is the new Cherry Cobbler Seam Binding and is tied into "TWO" bows... pretty cute, huh? The flower is made from a different sheet in the same Love Letter pack and I cut a number of different circles; first being the new 2 3/8" Scallop Circle punch, the 1 1/4"; 1 3/8"; 1 1/4"; 1" and 3/4" Circle Punches. I then spritzed the pieces, wadded them up and unfolded, layered on each other, then inserted one of the new red Glimmer Brads. I attached the flower to the card with Mini Glue Dots.

The Greeting is from Occasional Quotes and punched out with the Modern Label Punch...... so tomorrow I will mail this today and hope she gets it in time.

Thursday, September 23, 2010

Husband's Birthday


My husband's birthday is today!!!! I made him a card using the Autumn Spice Designers Series paper. It's so masculine and "heavy". I ran the top of my So Saffron Cardstock through the Big Shot using the Square Lattice embossing folder for some extra texture. I cut the cardstock for the bottom and attached two strips (old olive and cajun craze) of cardstock and punch them both with the Pinking Hearts border punch and layered them all together then onto the card base of So Saffron.
Then using my 1 1/4" circle punch, I punched out one of the flowery images from the Autumn Spice designer series paper and another circle from Old Olive usng the 1 3/8" Circle Punch and the another piece of the Autumn Spice designer series paper using the new 2 3/8" Scallop Punch. I spritzed the big scallop circle and wadded it up for texture and using my Cutter Kit I scraped up the edges of the other two circles. I took my Crop-a-Dile and punched a hole in the center of the circles after they were adhered together and inserted a Jumbo Brad and a Rhinestone Brad in the middle and adhered to the card with dimensionals. The greeting was made using the word window punch and then using the Modern Label punch around the Word Window leaving the center open. Then I stamped the Birthday Wishes onto a piece of DSP and punched out again with the Modern Label punch and attached the two together. To make the Cajun Craze border at each end, I punched some Cajun Craze cardstock with the Modern Label punch, cut it in half and attached on each end. I inserted a couple small Rhinestone Brads on each end and attached to the card with dimensionals. Hope he likes it...... but better yet he's going to be happy to go shopping for a new Yard Blower since his old one died!!! Not only that, but we get to close on our re-finance tomorrow, saving us bookoo bucks!!! Yea!!!
Have a Happy Thursday!!!!!

Tuesday, September 21, 2010

Christmas Ornament

One of my friends (Linda) had some round glass pieces with a hole at the top, perfect for an ornament and asked if I wanted to find something we could do with it. The glass pieces have a beveled edge making it even prettier than just a plain circle. I used one of the snowflakes from the Snowflake Set #2 and ran it through my Big Shot using a piece of a Decor Element sheet so it would stick onto the glass tightly. Since the snowflakes are "sizzlets" I had to add a couple pieces of cardstock to shim it up more in order for the die to cut the Decor Element Sheet. I attached the negative part of the cutout to the back of the glass and make sure it was tight around the image.
Then I used some glass etching cream and applied in all directions to the image and let it sit for 5 minutes. Then I washed the cream off the image and pulled off the element sheet.
I attached a piece of 1/8" Marina Mist Taffeta Ribbon and tied another piece around the top of the ornament in a little bow.
I think this turned out pretty cute!! Thanks, Linda!!

Friday, September 17, 2010

French Foliage

I think I'm in LOVE.......... I love lots of stamp sets I purchase, but I LOVE, LOVE, LOVE French Folage showin in the 2010 Holiday Mini Catalog on page 14 (120845-wood/ 121166-clear)...
I have already used it on a number of cards, some of which I have already shown you. I think these leaves are so true to life it looks like I stamped using a "real" leaf in my yard. I have a few other ideas for this that I'll show you, maybe tomorrow.
I needed a birthday card for my brother, so came up with this using the new French Foliage stamp set. I pretty much used the idea for the placement of the stamps on the sample in the Mini Catalog, but I put the rest of the card together myself; using the new Autumn Spice cardstock, Pear Pizzazz cardstock and Very Vanilla cardstock. After I stamped the piece of Very Vanilla with all the leaves and other embellishments, I used the Log Cabin Smooch Spritz for added interest.
I loved how this turned out so I also decided to use for my September club. Most of the girls ordered it as well as the Cajun Craze cardstock...... It's such a lovely color and even richer than the Really Rust that just retired. Cherry Cobbler looks great next to Cajun Craze so to give it a little more oomph, I used the Cherry Cobbler brads for dimension and interest. Don't you love it????

Wednesday, September 15, 2010

More Halloween

This Halloween card is 4 1/4" x 4 1/4" square, fun size and still fits in the regular sized envelope. The stamp set used is shown in the Holiday Mini catalog on page 7 and is called "Dark and Dreary". This scard also has everything new ... don't you love the new Spider Web Textured Impressions Embossing Folder????
I ran the Basic Gray cardstock through the Big Shot using the Spider Web folder and sponged over the image lightly with the Basic Gray Classic Ink. Then, I spritzed the embossed image with the Silver Foil Smooch Spritz.

I added a piece of the new Night Owl designer series paper and attached some new 1/2" Black Lace trim to the middle. The stamped image is stamped from the Dark and Dreary stamp set in the Holiday Mini catalog. I used my markers and colored the words with the Old Olive marker and colored everything else with the Basic Black marker. I stamped again on some scrap cardstock coloring in the "31" with Tangerine Tango with the marker and punched out with the 1/2" circle punch and attached to the main image with a dimensional. The spider was also stamped and cut out from scrap cardstock and attached with a dimensional. Check out the black "jewels". These are found on page 8 of the Holiday Mini Catalog. You can either use the full flourish on something or just use the jewels separately. See how easy this is to make, just using a few of the new accessories to dress it up!!!!
BOO!!!!!

Tuesday, September 14, 2010

Merry Christmas

This Christmas card is using lots of new products from both the 2010/2011 Idea Book & Catalog and the new Holiday Mini Catalog.
The base of the card is Crumb Cake (formerly Kraft) and measures 3 x 6". I covered the front with some of the new Deck the Halls designer series paper shown in the Holiday Mini catalog. I tore three of the edges and curled them up a bit, but left the bottom a straight edge. On top of that I used some Very Vanilla cardstock and cut into the shape of a "tag" and stamped with the "Christmas Postcard" stamp in the Holiday Mini Catalog. It was colored in with aqua painters using Crumb Cake, Cherry Cobbler, Always Artichoke and More Mustard classic inks. The edges were sponged with crumb cake classic ink. On the edge I attached a piece of Cherry Cobbler cardstock punch with the Scallop Trim Border. I then gathered and attached some of the new Victoria Crochet Trim shown in the 2010/2011 Idea Book and Catalog on page 190. The inside of the scalloped edge on the "tag" I applied some Tombo Multi Purpose glue and sprinkled on some of the new Champagne Glass Glitter. It is so gorgeous and chunky.
Have a Delightful Day!!

Monday, September 13, 2010

Halloween Treat BAG

Good Morning Stampers. I was watching Angie Juda from Chic N Scratch on "Streaming Live" while she made this really cute Halloween Treat Bag..... it was so cute, I made it along with her!!! She used one of the new Mini Lunch sacks that measure 3 1/4" across. At the time I didn't have them yet, so I played around with a regular lunch sack until I could cut it down to the same size as the Mini ones (and let me tell you, that was a trick in itself!!!). I'm not showing you all the places where I had to tape the sack all over to get into a sack shape again ha ha. The images on this are from Halloween Hoot and I LOVE this witch!!! Up in corner, I punched out the bat from the brand new Mini Bat Punch shown in the 2010/2011 Idea Book and Catalog and attached with dimensionals. The little frog was colored and cut out and attached using dimensionals as well so it would pop out. The top image is attached to the top portion of the covering on the bag with velcro. Isn't this a fun treat bag??? They are fast and easy to do and like everything else, doesn't have to carry a Halloween theme... Think Christmas!! I'll show you what I put together for Christmas.
Enjoy your day!!

Sunday, September 12, 2010

Halloween Fun

I showed you pictures of my GIANT sunflower the other day; the picture was actually taken on 9-2-10 so it's now been 9 days. In that time the "flower" has grown huge and the little one underneath it seems to be growing pretty fast as well. Look at them NOW!!! If you look at the second picture closely you will also see a honey bee having breakfast LOL.

I finally got the Candy Wrapper Die for the Big Shot the other day and it's so fun. I have lots of plans for it, but for now, I will show you what I did for Halloween. I used the new Wicked Fun Designer Series paper and covered some Basic Black Cardstock before I ran it through the Big Shot. I punched a small hole on the edge of the fold and hung a small tag punched with the Small Tag Punch and stamped with "BOO" from the Tiny Tags Stamp Set.

I also played around with the Milk Carton Die and make a spooky little house. Since I closed off the top, I made access through the bottom to get the treats inside. The roof is so cute, I used the scallop edge die and stacked the pieces all the way down the roof. I decorated the cardstock for the carton using the Wicked Cool stamp set and attached a Mini Vintage Tag and attached the bat on a dimensional from the same set.
Enjoy your day.

Saturday, September 11, 2010

Oh LOOKIE!!!!

Look what I got today from Stamin' UP! I can't believe I've been a demonstrator for 5 years already..... I remember the DAY I signed up.... can you elieve my decision was for a set of Stampin' UP! classic ink pads????? Whatever it takes for you, to me it was the best decision of my life. I ABSOLUTELY LOVE my Stamping business and have enjoyed 4 conventions and three Regional events..... They are the BEST!!!

This month, you can get the Craft Tote valued for $40.00 free when you sign up as a demonstrator. I showed my husband my new "PIN" and he said 5 this year then another 25 years down the road.... I don't know if I can still stamp then, but I hope so ha ha ha.


I had a workshop at the end of last month and their orders came today. I gave them all a Thank You card using the French Foliage Stamp set that's in the Holiday Mini catalog. I really love this stamp set and hope it moves over into the 2011/2012 catalog next year. I think the leaves are so real looking... much more so than any other leaf stamp in the past. I will post something later showing the fall leaves incomparison to the stamp set. Did you notice the "retired notecard set"??? Well, the colors are now in again... can you believe it? Stampin' UP! may not sell these specific notecards any longer, but you can make the same thing using the scallop edge border punch and the same (or other cardstock) colors (the cardstock should measure 2 3/4" x 8") folded in half then the top edge punch with the scallop edge border punch. The envelopes measure 3" X 4 1/4" and aren't available anymore, but you could still use the regular medium sized envelopes (4 3/8" X 5 3/4") or the clear translucent envelopes.

Friday, September 10, 2010

Just for You

One of my most favorite habits is sunflower seeds (I absolutely LOVE them). This spring my husband planted a "giant" sunflower on the side of the house, but because of the weather being so cool this summer i'm not sure we're going to actually get the sunflower seeds out of it. It has taken all this time for the plant to grow and I would never have believed how big it got. I was expecting maybe a large flower with lots of large seeds?????? Well, we still have to see about that, but look at this plant, it's up to the eve of the house. It's HUGE and look how large the stalk is on it; it's the size of some trees we've purchased!!! In the past any sunflower we have grown have only been maybe 6-7 feet high, so this was a total surprise to me. I'll let you know if we get anything from the flower or not.

I have a very special friend/customer who always orders lots of really fun stuff. So since she ordered outside her club or any other of my events, I wanted to thank her, so I made her a card that she can send to someone else if she wishes..... I always hesitate posting cards on my site because so many times I have cased them; thinking I haven't a creative bone in my body.. I know I've mentioned before that when i actually create them, I receive more comments than if I copied someone elses.... ha Anyway, this card is totally created by me... I hope there isn't one like it out there somewhere because it would be a total accident. Both of the stamp sets used are hostess sets out of the 2010/2011 Idea Book and Catalog. You can earn these sets with a workshop with a merchandise order of $150.00 or $300.00 for the Afterthoughts set. Call me if you would like to host your own workshop, invite your friends, have snacks, gossip, laugh and make cards.......
Stamps: Apple Blossoms; Afterthoughts
RECIPE:

Paper: Poppy Parade; Not Quite Navy; Whisper White; Hostess DSP in-color pack
Ink: Poppy Parade; So Saffron; Baja Breeze; Not Quite of Navy; Sahara sand
Accessories: Hemp Twine; Candy Lane BIG Buttons; Extra Large Decorative Label Punch; Poppy Parade 1/2" Stitched-Poly Ribbon; Sponge

Have a GREAT Day!!!

Thursday, September 9, 2010

Flower Power Party

I forgot to show you the pictures of the Flower Power Party on the first night we arrived. The first picture shows Shelli Gardner and her husband....(Shelli is the one in the hat and her husband is next to her..... she's the CEO and founder of Stampin' UP!) The rest of the pictures are random...


I Some of the outfits/costumes were absolutely perfect and wouldn't you know I didn't get pictures of most of them..... we were crowding into the gathering room (if you haven't been to convention, you won't know what I'm talking about.... it's sort of like Running with the bulls in spain) ha ha The wonderful things I saw were as I was being pushed through the group, not time to stop to take pictures....... but here's a lot of what we saw. There were contests with hula hoops and dancing, etc. and give-a-ways of free Stampin' UP! products.... what a fun night!!!!

Wednesday, September 8, 2010

Sweet Shop

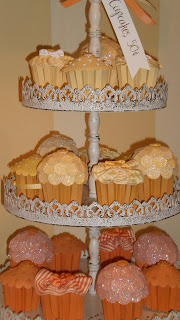
Oh My gosh, I almost forgot to show you the best thing at Convention........ We toured the Riverton Office where they had displays of things, in addition to lots of other places; but in their Sample room and also on display at the Convention Center was the "SWEET SHOP". Look closely at the items I'm showing you..... blow them up for a really good look. ALL OF THESE ARE MADE OUT OF PAPER!!!!!!! (or buttons). This was so fun to see. It looked like you could just pick up one of these items and eat them they were so REAL! These are just a FEW of the things on display; I can't believe how incredible they were.


Tuesday, September 7, 2010

Definitely Decorative

Oh Look, what fun are the Definitely Decorative images!!!!! Not only is the Happy Halloween a part of the Dark and Dreary Stamp set but it's also a Decor Element. Check out this fun frame that was decorated using several stamp sets as well as the Decor Element on the top of the glass. It is gorgeous in person. The picture doesn't do it justice.

This next picture is of a coaster used for a coffee cup. It couldn't be easier to make..... a piece of thin batting was used between the new Stampin' UP! fabric and tacked down on the corners and center.


Look how cute this coffee cup is using Decorative Elements on the cup. What a fun inexpensive gift ( the cup and the coaster). It's recommended that you wash the cups by hand as these adhesive may come off in the dishwasher.


This next picture is of a Luminary. It was made using the new Night Owl Designer series paper. One section of the square was cut out using the Top Note die and Vellum cardstock with a Decorative Spider Element placed over the punched area. The top of the Luminary is decorated using the new Waffle Paper and gathered around the top with stick strip first put on the cardstock.
All you have to do is place a votive or a battery candle inside to illuminate it.
Fun, Fun, Fun!!!!!!!

Monday, September 6, 2010

Handouts

I thought I would share with you what Kimberly VanDiepen does to get new customers every time she moves....... it's fabulous. I decided I would try the same thing so I made up around 50 cello bags with the fabulous new Holiday Mini Catalog, my Business Card and a Mini Note Card made from one of the Mini Catalog Samples in the book.....
I made these cute little notecards using the new French Foliage stamp set. I really love this stamp set, it's the closest I've seen to leaves in a long time and these cards turned out so cute. I used Cajun Craze, Cherry Cobbler, So Saffron and Early Espresso classic inks. I also used a metallic brad to hold "grateful" onto the card.
I've only given out a few at this point, but the plan is to give out 5 a day.... this is a challenge to me and if you want to increase your customer base I challenge you. If you try this, let me know how it works for you!!!

Sunday, September 5, 2010

Fabulous Craft Tote

Did you know that you can join my group with Stampin' UP! and receive this fabulous $40.00 craft tote for FREE?????
Stampin' UP! has kept the new Starter Kits as low as $175.00 for both the regular kit and the Digital + starter kit.
Being a demonstrator will save you 20% on ALL your orders and your customers orders; give you pre-order bonuses before anyone else sees the new products/catalogs; gives you the opportunity to attend Convention where you learn so much information and win free product and the opportunity to attend regionals. That's not all..... if you are interested in the saving and incentives, please give me a call with any questions you may have, I can help you decide what you want to do. My group of demonstrators are so talented and fun; we get together monthly for meetings and demonstrations for new ideas and share what we have done and also swap card fronts with each other giving us new samples/ideas to use in our business.
I would LOVE to have you join my group and ALSO GET THIS FABULOUS CRAFT TOTE FOR FREE!!!!

Saturday, September 4, 2010

Stampin' UP! Fabric

Did you know that Stampin' UP! has come up with Fabric that matches some of the new Designer Series Papers (Candy Cane Christmas and Deck the Halls)?. It is so cool. At our Demonstrator Demo meeting one of the gals showed what she has done with the fabric with quilting. She used her big shot and big shot dies to cut the images that she sewed into her runners or wall hangings. The other things she came up with is the card with her Monogram. The cardstock on the card was made by using her stamp pad and running it along the cardstock to make it sort of "woody looking". The next card (don't pay any attention to my really vibrant "fingerprints" I got on it after I came home... of course I can't get rid of it) is cutting circles using the big shot and the fabric and adhering it on using the fabric adhesive and an iron... same thing with the monogram above. this last item is a scrapbook page...... now how easy is this????? The page is using one of the pages from the Deck the Halls Designer Series Paper set, adding a piece of the new "seam binding" down the edge; then a piece of the new fabric after it was gathered with thread next to the seam binding. How simple and gorgeous these new products are......

AND, look at this great coaster using the fabric with the fabric adhesive sheets!!! What a fun gift for someone!!

So..... what are you waiting for... get your Holiday Mini Catalog and start planning for all your Holiday events and order what you need so you can get started. This is probably one of the best mini's ever!!!!!