Wednesday, December 31, 2008

I was looking back to when I started my blog and noticed what was going on last New Years Eve. Since this is Stampin' Up's 20th Anniversary, there are still a lot of promotions/specials saving you 20% off of stamp sets, even from the new 2009 Spring Summer catalog!!


The retired stamp sets are available until 1-18-09 even though the discounted price is gone. Remember, these stamp sets will NEVER be available through Stampin' Up again, so check the list to make sure you have everything you need before they are no longer available.


Don't forget to check out the Fall/Winter Catalog Sampler for the stamp sets that are still available at 20% off until 1-18-09. All of these stamp sets will be available when the the Spring Summer catalog is revealed, so if you want to save money, now is the time to order them while they are still discounted.


The Love You Much Valentine Bundle is currently available for purchase at 20% off the retail price of $51.85. You can purchase the following items as a bundle for $41.48 until January 31st.
Love You Much Stamp Set
Candy Lane Designer Series Paper
Heart to Heart Punch.
The punch fits perfectly with the heard stamp in the Love you Much stamp set. These items will be available in the new Spring/Summer catalog, but after 1-31-09 they will be only available as individual purchase at the retail price. These items are so fun and all go together so well. You will see some fun samples here on my blog and you will fall in love with this. Valentines Day is coming soon, so take this opportunity to purchase what you need in time for the BIG DAY!!
The best of all is coming soon............. Sale-A-Bration starts 2-1-09 through 3-31-09. For those of you who aren't familiar with Sale-A-Bration, for every $50.00 you spend on catalog purchases you are eligible to choose a FREE stamp set or product from the Sale-A-Bration catalog. There's lots of ways to obtain the free stamp sets and products:
  • Purchase $50.00 in catalog merchandise (before tax & shipping)
  • Host a $300 or more workshop and you will receive free products (in addition to the normal hostess benefits)
  • Choose to sign up as a Stampin' Up demonstrator and you can choose ANY RETAIL STAMP SET FROM THE CURRENT CATALOG WITH A VALUE UP TO $47.95.
  • If you sign up as a demonstrator and have sales during Sale-A-Bration you will be eligible to receive either free Catalog sets or free Sale-A-Bration sets depending on your sales during the promotion period.

Kwerner Color Challenge


Kristina's Color Challenge was perfect for the new Raspberry Tart paper and the new Sweet Stems embosslit. I also stamped the Sweet Stems image on the Rose Red cardstock underneath the embosslit image. Enjoy

Candle Making

I don't know about you guys, but I always hate to throw away what's left of a candle after it burns, so I save all the pieces in baggies all year and when I don't have anymore room on my shelf, I get my candle making stuff out and start melting down the wax and pouring into molds to make "new" candles. I always have candles burning, so we go through a lot of them. Last night I got a wild hair and decided it was time again. The only real problem I have is when the wax cools and the center sinks down into the candle; then you have to keep re-pouring until the wax stays level. What I found this time is that I must be doing something wrong, because when I took them out of their molds, I had these rings on the top that kept chipping off, so I had to do some surgery on the top, LOL. They actually turned out pretty good though.
I have wax blocks too that I melt down and put in colors and smells, but I don't do that as often as the melting down of the prior candles I have purchased.
A while back my husband got a hold of some PVC pipe and glued an acrylic sheet on the bottoms and made me three more molds. The tallest one, and the one to the left and the short round tan one are all from the PVC pipe molds. The rest are from molds I purchased.
I think I need to practice some more to see if I can't make them a little prettier or fancy or something. Maybe some of these need some designer series paper, ribbons or maybe some rub-ons. What do you think? Maybe I'll play with them a bit and see what I can come up with.
Enjoy!!

Tuesday, December 30, 2008

Candy Skewer

Andrea Walford is so very creative and the most fun projects to share. I saw her video on how to make this cute candy skewer with the Christmas tree on top and the candy pushed onto the skewer. My plan was to make these for the people I work with for Christmas, but time didn't allow. I finally got to make it yesterday! It's fun and easy to make; even though it gets a little sticky pushing the candy onto the bamboo skewer. The tree is made by punching out 3 circles of each the 3/4"; 1 1/4" and the 1 3/4" punches. Each circle is folded in half, then in half again and then each side is folded back against itself and then punched through the centers using the 1 1/16" punch. The star on top is punched using the small star punch, glittered and adhered to the top of the skewer with mini glue dots. The bag is a cellophane bag approximately 10" long and tied onto the candy portion of the skewer with a silver cord. Aren't these adorable? Try one for yourself. These could be re-vamped for Valentines day, don't you think?

Monday, December 29, 2008

My Brothers Christmas Cards

One of my brothers has been watercoloring for a long time. This one is a lot different than some of the ones I've seen before, looks like Greece to me. This is the Christmas card he sent out this year. He has been introducing my other brother and my sister into watercoloring over the past several years and my other brother, Jon has finally started doing a lot of watercoloring. This is his very FIRST Christmas Card and I think it's absolutely adorable!!! It's basic like a
child's drawing, which makes it so special. I'm proud of him!!!
My brothers may not be Stampin' Crafty, but they can sure create an original watercoloring without the help of stamps. I can't draw a straight line nor much less draw something to even look "sort of like it SHOULD look like"; that's why I like to stamp, at least it resembles the image it's intended to. LOL

Sunday, December 28, 2008

It's SNOWING

I ABSOLUTELY LOVE SNOW!! I don't know why I say that since it's scares me to death to drive in it anymore. I know many of you have WAY more snow than we do, but it's been so long since we've had much measurable snow and especially on Christmas. What really made it fun is my son brought his girlfriend home for Christmas. She has grown up in San Diego, CA and has NEVER SEEN SNOW FALL nor has she ever seen AN ICICLE!!! It was so much fun watching her joy in watching the snow fall and going out to make her first snow angel and catch snow on her tongue. It makes you think about what some of take for granted or hate to see because of the inconvenience of it.
Aren't these pictures of the snow beautiful? If the forcast holds true, it's supposed to warm up and start raining... I hate that. I would like to see this stick around a bit and look pretty through the holidays.


Saturday, December 27, 2008

Christmas Cards from friends

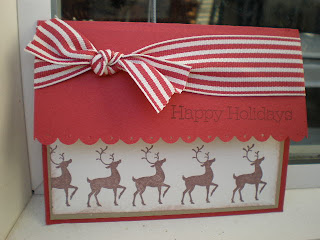
This is a Christmas Card I received from one of my friends using Stampin" Up! Stamps. Her cards was based on a card we made at my Christmas Card class using the Winter Post stamp set and the Reindeer as shown here.

This card came from my upline. She stamped, glittered and cut out the house from To You & Yours and attached it "over" the stamped image from Lovely as a Tree. Isn't it gorgeous?


Sunday, December 14, 2008

Pink Camo Dogs & Circle Flip Book

My husband and I are such suckers for fun new things for our three girls. Today we went to buy dog food and found some really cute dog sweaters. They were 25% off AND we also got a FREE camo fleece lined coat. So, of course we had to get one for each of the girls, right? Well, we brought out three "small" sweaters and our three "small" camo coats and tried them on them. Our girls are really quite small, but would you believe they were all too small for them. So we loaded the girls up and took them with us to go back and exchange them for mediums. Because they all decided they had to go potty by the time we got there, my husband was busy taking them all out in the grass while I went to get the medium sizes. We got back home and now they are all too large. As soon as we put the coats on them, they stepped right out of the armholes. Actually, the coat fits quite nice on Lucy; I think she's the bigger of the three. I guess we'll wash the sweaters to see if we can shrink them some, but the camo coats won't because they're nylon..... but they are still cute and I had to share. What's better than three girls in Pink Camo????


I found this cute little Circle Flip Book and had to try one for myself. These are really easy and fun to make. These will make such cute gifts with photos of a fun event, graduation, birthday, baby, etc. The instructions for this book can be found on Splitcoast Stampers. The large circles are made from cutting around a salad plate, then folding into fourths. Check out the tutorial on Splitcoast Stampers and make one for yourself. All you need to do is decorate it for the event. Thank you for stopping by and I hope you enjoyed my project.

Friday, December 12, 2008

Decor Elements

FINALLY!!! I finally did it. I put my Decor Element (the Create definition) on my wall in my stamping room. While I was struggling to get it first off the graph paper, then onto the wall I then remembered that I had read it should be at room temperature. I know it was at room temperature; however, I had it stored on an outside wall which may have made it a little cooler than I would have thought. I struggled a bit, but it really is pretty easy. I had originally planned to separate the "paragraph" and put it in a line at the top of the wall along the ceiling. Now, I'm glad I didn't do that. I think my next project will go much easier now that I've done this one. I think the hard part of this one is all the letters. There are so "many" areas that didn't want to pull away. My next project is Organic Outline. The images are extremely large, so for one, they will be put up one at a time so I'm anticipating a much easier transfer. I'm planning to put those in my bedroom around the bathroom entry; I'm really anxious to do that project. As soon as I do, I will show you how it turned out. Anyway, I am attaching photos of this project and actually, I think it looks pretty awesome.

Wednesday, December 10, 2008


I found the cutest box with acetate windows on all four sides and of course I had to try it. You can fill with candy or another cute gift for Christmas or with a change of decoration for any event. I think that if I were to do this again, I would probably make it smaller. Like the box I made a few days ago, it is so large, it takes a lot of candy to fill it. Depending on who or what the occassion is, it can be scaled to whatever size you would need it to be to accomodate the contents.

Tuesday, December 9, 2008

Fall/Winter Retiring Stamp Sets - 10% Off


THE RETIRED STAMP LIST IS HERE!!!!!!!!!!!!
You can purchase these stamp sets through January 18, 2009 while supplies last, but between today, 12-9-08 through 12-23-08, you can purchase them for 10% OFF THEIR LISTED PRICES. AND NOT ONLY ARE THEY DISCOUNTED, BUT ANY ORDERS $70.00 AND OVER DURING THIS PROMOTION WILL HAVE FREE, YES I SAID FREE SHIPPING. The free shipping will save you AT LEAST $10.00 with that size order. The following link will bring up the listing of the stamp sets, their retail prices and the discounted prices.

http://www.stampinup.com/us/documents/US_10_percent_off.pdf

Take advantage of this awesome sale and call or email me with your order. You can also take advantage of the online ordering. Just go to my website http://www.janetelam.stampinup.net/ and click on "Shop Now". If you order online, you will be eligible to earn a free stamp set from me.

Now, don't forget, these sets are only discounted between 12-9-08 and 12-23-08. They will still be available while supplies last through January 18th, but only at the retail prices again.

Sunday, December 7, 2008

Meeting Demonstration

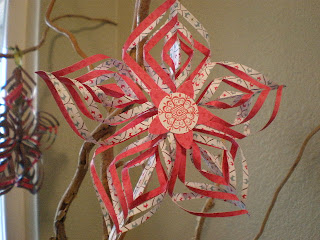
Our demonstrator group had a meeting on Friday night and Carrie Rhoades, one of our demonstrators showed us how to make the cutest snowflakes. I took a few pictures of what she did, then I came home and made lots. My husband is so funny. He doesn't really pay a lot of attention to what I do, but this time he kept asking if I was going to make more and when a friend came over to visit this afternoon and saw them, my husband asked me to make one for his wife. LOL. I have a large pot beside my front door that has Weeping Willow branches in it; I decided that was a good place to hang my snowflakes on so I took a picture of that you can see how they look on my Weeping Willow Tree :) These are so really pretty and easy to make. Not only are they cute to hang from your tree or on something like this, they would also make really pretty Christmas package decorations to attach to ribbons.


Monday, December 1, 2008

Fall/Winter Sampler Promotion begins today

Starting today, 12-1-08, spend $20.00 on regular merchandise, then you can order any stamp set in the Fall/Winter catalog sampler at 20% off. Click on the attached link to view the sampler.
http://www.stampinup.com/us/documents/Sampler_US.pdf
You can call, email me or order online to have your order delivered direct to your door.

Christmas Class Give Away


I made these cute little favors for my Christmas Card class this week. They are sooo cute. I cut out the scallop circles from brown felt using my Big Shot, then I bagged several peppermint sticks in a cellophane bag tying shut with the gold elastic ribbon from the Mini Catalog. I stamped the "Do Not Open til Dec 25th" from the Winter Post stamp set then punched out with the Label punch. Then I tied some more gold elastic ribbon through the punched hole in the label and tied again about an inch up. Then i tied the wide red & white striped ribbon from the Mini Catalog around the felt and peppermit sticks and attached the label with the gold ribbon to the knot and tied into a pretty knot on top. I found the peppermint sticks at Walmart. What a fun and easy gift for friends and co-workers. What do you think?????

Saturday, November 29, 2008


I saw this really cute box on Andrea Walford's website and since I've been making a lot of boxes lately, I figured I could do this...... so I did. Well, I made it so big that it took a half a bag of candy to fill it. It's cute, but next time I think I will make it MUCH smaller. This one is 6" X 2 1/2". I decided that this would be an excellent give away gift for my Christmas Card class I'm having this week... what do you think?

I made this using the Riding Hood Red Cardstock for the base and a piece of acetate for the window. Then I used a piece of pirouette pink cardstock and attached some bella rose DSP over the top. then I used the punches 3 for the merry christmas stamp and punched out with the scallop square punch, then attached to a piece of Kiwi Kiss CS and cut around trying to mimic the punch (not very good) and then I used the Do Not Open til Dec 25th from the Winter Post set and adhered to Kiwi Kiss CS punched out with the scallop edge punch. The lid is punched along the bottom edge with the Scallop Edge punch and Regal Rose 5/8" grosgrain ribbon tied around it.

Whoever wins this better LOVE chocolate!!

Thanks for stopping by..............................

Wednesday, November 26, 2008


Holiday Extravaganza Sale Starts NOW! Save 20-50%
Take advantage of fantastic Stampin' Up! savings (up to 50% off) NOW through December 1.
TIP: Don't miss the Curly Label Punch Bundle (1129665) or Mission Embossable (116223) at 30% off!
Quantities are limited.
CLICK TO VIEW SALES FLYER!
ORDER STAMPIN' UP! ON-LINE HERE!

Sunday, November 23, 2008

Can you believe ANOTHER birthday????


From the end of September until the day before Christmas we have most of the family birthdays!!! It makes the Christmas season very expensive LOL. Can you believe ANOTHER grandson's birthday is tomorrow? I pretty much copied a card I saw, some of the colors are different and the layout somewhat different, but I think it turned out really cute. I love that little snake from Zoofari. The background paper is from the Summer Picnic DSP. The birthday greeting is from Hugs & Wishes and the Everyday Flexible Phrases. The cardstock is bashful blue, pumpkin pie, so saffron and whisper white. I used the 3/4" and the 1 1/4" squre punches and the Photo corner punch. I hope Zachary likes this card..... he likes bugs and things and the fake rubber snakes in our toy box, so he should. Thanks for stopping by.

Saturday, November 22, 2008

Birthday Greetings

One of my Grandsons turned 16 this week. It's hard to believe they grow up so fast, it seems like only yesterday when he was born. He's such a cutie. It's hard to come up with masculine cards that aren't boring and that are appropriate for teenagers. I finally came up with a combined idea from several different websites and this is the result. I think it's really cute and different from what I usually do. The pumpkin pie circle was pierced around the edge. You might have to make it bigger to see that. It's really hard to make it even all the way around 3 times LOL. The scallops around the pumpkin pie circle are 1" circles punched out and glued to the back. I also used the Scallop edge punch and the 1/8" hand held punch on the Close to Cocoa strip across the card with a small strip of Haiku designer series paper adhered on top. The Birthday greeting is from the Chit Chat Rub-ons.
Thanks for looking, have a nice day

Wednesday, November 19, 2008

Another Kwerner Challenge

The colors Kristina chose for this week go together really well and all I could think of was Fall and Thanksgiving. I used Lovely as a Tree Stampin' Up stamp set to stamp the Oak Leaves on the So Saffron cardstock, then I colored them in using So Saffron, Pumpkin Pie and a little Close to Cocoa classic ink pads with the aqua painter. The Big Tree in the center I also watercolored with the Aqua Painter using the same colors as the leaves. then I roughed up all the edges with the distresser tool making the card a little more masculine and out-doorsey. I wrapped the Elegant Eggplant grosgrain ribbon three times around the card and adhered them to the back of the So Saffron cardstock. After I was done, I thought it looked a little plain, so I inked up my main tree image in VersaMark and stamped it on the tree again and embossed with clear embossing powder. I tried to get a picture of how the versamark looks, but it's much prettier in real life. The "Happy Thanksgiving" is also stamped using the VersaMark, then stamped into the Elegant Eggplant and embossed with clear embossing powder. To help tie in the colors, I spritzed on some Elegant Eggplant ink using the stampin write marker.


Tuesday, November 18, 2008

Birthdays, Weddings and Such

I made a number of cards last week for birthdays, weddings, sympathy, etc. and was so excited that I actually made them in time for the events that I forgot to take pictures to show you. I needed to make some swap cards for tomorrow night, made the mistake of asking my DH which ones he liked the best and he chose the one that (unknowingly) took the most time. Thank goodness I only had to make 11 because even those 11 took me about 5 hours tonight... nothing like waiting to the last minute, huh?
I talked with one of my customers on Saturday and she has already finalized her New Years Eve party.....I can't even imagine planning that far in advance since my life is usually fly by the pants and do what you can as quickly as possible :) Maybe you have already noticed that about me. LOL
I thought I would show you my swap card which I originally made for a wedding and totally copied from someone, but I think it's gorgeous.
I used the Shimmering White cardstock with the brushed silver. Then I took the Baja Breeze cardstock and scored it first down the diagonal from the center then 3/4" each direction from there and again turning it around. At each "intersection" of scoring, I put a drop of crystal effects and dipped in silver glitter. I punched out a 1 1/4" circle of Brushed silver and attached three flowers from the Embrace Life Stamp set. I tied the white taffeta ribbon around the card stock. At the bottom, I stamped the Define Your Life "Perfect" stamp on Shimmery white CS and attached to the Brushed Silver and cut around with scissors for a border. In real life this is really a gorgeous card.
Also, keep in touch with my stampin' Up website and/or my blog because Stampin Up has announced they are having an Extravaganza sale between 11-26-08 and 12-1-08 (ONLY 4 DAYS)

Saturday, November 15, 2008

It's Beginning to Look a Lot Like Christmas!!!

It's Beginning to Look a Lot Like Christmas!!!!!! (La de Da)....... Stampin' Up has put together a fun Gift giving Guide for anyone on your list. These ideas are always fun for everyone and will also give you a chance to spend quality time with family and friends stamping, laughing and having fun making special gifts, cards, and projects. I'm sure, like me, once you've tried out some of the fun ideas, products, papers, ribbons, etc. you will be hooked. Have any of your family and friends commented how much they enjoy your hand stamped items and even though they throw away store bought cards some time along the way, they "always" keep yours? I enjoy seeing people's faces and hear the comments when they open my cards and gifts because they are special and one of a kind. The following link will help you in deciding what would be a fun gift for Christmas to share. Follow the link and call, email me or order online by going to my Stampin' Up website http://www.janetelam.stampinup.com/ and clicking on "order now" at the top of the page. http://www.stampinup.com/us/documents/gift_giving_guide_us.pdf
My customers have already commented on how easy it is to order online and not only that, the products are delivered to their door within just a few days. Give it a try, like Mikey I think you will like it too.

Tuesday, November 11, 2008

Kristina Werner's color challenge

I have really enjoyed doing the color challenges Kristina Werner has thrown out. As I said last week, it makes me actually use my own imagination, which is "sort" of getting better. I still tend to copy others except for these challenges, which makes me more confident each week. I love the colors this week, they are so soft and feminine, the sort of colors that are relaxing. in fact, the paint in my house is called "herb
ivore" which is close to these two greens combined. I also have absolutely loved the Organic Outlines stamp set, so this was a good challenge for me. I made this a 6" X 6" card, which is unconventional for me, but I love the look. After I stamped the images on the Whisper White, I cut out three areas and propped them up on dimensionals to stand out to be 3 dimensional. I also added the Old Olive ribbon and some White Ribbon for dimension as well as a clear round button with some of the DSP paper I used on the card as well as a certainly celery button on top of the clear button attached with some natural hemp twine. The greeting is from the Chit Chat Rub-ons and I added some half pearls from the Pretties Kit. I think this card turned out pretty cute.


Monday, November 10, 2008

RUB-ON PROMOTION STARTS TODAY!!!!
Want to add crisp and beautiful accents to your projects in a flash? The November Rub-Ons promotion begins today, November 10. Through November 30, you can get 20 percent off ALL Rub-Ons with a qualifying purchase of just $20. TIP: When ordering on-line, please be sure to add your $20 purchase first so that the rub-on discount is calculated.
PLACE YOUR ON-LINE ORDER HERE!
All Rub-Ons offered in the Holiday Mini and pp. 178-179 of Stampin' Up!'s Fall/Winter Idea Book and Catalog are included.

Wednesday, November 5, 2008

I have had so much fun trying out the color inspirations from Kristina Werner's challenges. I am pretty famous for just copying other peoples creations, but this is actually teaching me to challenge myself and come up with some of my very own creations; that's pretty exciting. I'm sure my customers would like to know that I can actually use some creativity and help them with theirs. These colors were extremely challenging for me; it seemed like the Pacific Point and the Taken with Teal sort of clashed, but I do like them together. One of my favorite colors, Elegant Eggplant is easy for me to put together with other colors. I actually used all of the 5 colors and water colored, layered, embellished and even used a rub-on. Even though this is meant to be a "Christmas Card", it's sort of unconventional, but I like it, do you?

Saturday, November 1, 2008

Country Living Holiday Kit

NEW! Stampin' Up! Country Living Holiday Kit
Create beautiful handcrafted ornaments and decorations with your family and friends this holiday season with the Country Living Holiday Stamp Kit (Item #114447, $49.95)--available only while supplies last. The kit offers a convenient way at this busy time of the year to create simple and elegant ornaments to brighten your home or share as hand-crafted gifts.


Click HERE to order this set (114447) online 24/7


The Holiday Collection Stampin' Kit (Item #114447, $49.95) includes the following products:
Holiday Collection stamp set (six stamps-)
Four 12" x 12" sheets of die-cut chipboard
Eight 12" x 12" sheets of die-cut Designer Series paper (2 ea. of 4 double-sided designs)
Four 12" x 12" sheets of Designer Series paper (2 ea. of 2 double-sided designs)
Two 12" x 12" sheets of Whisper White card stock
25 yds. Silver Metallic cord
10 yds. 3/8" Whisper White taffeta ribbon
Pretties Kit brads (20)
Stampin' Dimensionals
Dazzling Diamonds Stampin' Glitter (1/2 oz.)
Tombow Multi Purpose Adhesive
Riding Hood Red Classic Stampin' Spot
Old Olive Craft Stampin' Spot
Uninked Stampin' Spot
Whisper White Craft Ink refill

What a fun and affordable way to make unique and beautiful projects for the holidays! Watch for the 8 page spread of ideas in Country Living magazine!