Stampin' UP! has outdone themselves with their My Digital Studio program for digital scrapbooking, cards, calendars, video, etc. The program is so unbelievably easy to use and features so many downloads of Stampin' UP! stamp sets, designer series papers, cardstocks, ribbons, accessories.......
I have added a link to the new flyer describing in more detail what this program has to offer and after reviewing let me know if you have other questions....
http://www.stampinup.com/us/documents/MDS_Product_Flyer_Web_US_1210.pdf
Tuesday, January 18, 2011
Thursday, January 13, 2011
Why Don't You Join Me???
Why don't you join my Stampin' UP! family and save money on your Stampin' UP! orders. Right now during Sale-A-Bration (1-25-11 thru 3-31-11) if you join at $175.00 (15% off the regular price) for products valued at $350.00 you will also get a Bonus Bundle of products valued for an additional $50.00. Click on the link below and see what else you will receive along with your regular start up products.
http://www.stampinup.com/us/enu/17247_19769.asp
Did you also know that new demonstrators receive 30% commission on their VERY FIRST order??? You don't have to sell or hold classes if you don't want to, but you will save 20% on every order you submit. Not only that but you can also pre-order products before each promotion or any catalog unveiling. Convention is the ULTIMATE reason for joining.... Convention is so inspiring, and fun with make and takes, demonstrations, FREE products, games, etc. If you want to make this a business you can also earn FULLY PAID FOR trips/cruises each year for you and your spouse or a friend. There's just too much to tell you in one writing, so if you are interested in JOINING ME, give me a call to discuss!!
Tuesday, January 11, 2011

I saw these cute treats on someone's blog and thought what a cute idea for the new stamp set "Eat Chocolate"
I made one for each of my club members so they could see how much fun this set is and can use for their own special treats for Valentines Day, Birthday or Special Occasion.
My original plan was to use sticky strip down each side to keep the pocket closed but noticed that it made the candy bar really tight in it, so I thought I would try the Tombo Multipurpose glue and it worked as well!!! I was afraid that when I slipped the candy bar into the pocket it would pull apart, but it didn't!!!

Here is a closer look at the treat. It's so easy to make. I cut 3 X 12" strips of DSP and folded each one in half. I used my corner rounder punch to round the top corners and folded the front piece down about 1 1/2". Then I glued the sides "very" close to the edge giving the candy bar enough room to slide in easily. I stamped the "So Much Chocolate, So Little Time in Early Espresso onto Whisper White cardstock then punched it out with the Wide Oval Punch. I layered that onto a piece of Early Espresso punched with the Decorative Label Punch. I also stamped the To Do List onto Whisper White with Early Espresso ink and punched it out using the 1 1/4" square punch and layered that onto a piece of Early Espresso cardstock that was punched out using the Scallop Square Punch. I slipped the candy bar into the pocket and tied some of the 5/8" Organza Ribbon around the top and tied into a bow. Then using some Linen Thread, I attached the To Do List to the bow. Wala....... easy as pie.
Try your own Chocolate Treats, they're fun to give..... I think I will be making about 15 more of these for another event I'm part of. I hope everyone likes them.
Have a GREAT DAY!!

Monday, January 10, 2011
Valentines Day Ribbon Card
 I learned this technique to layer ribbon inside a punched or cut-out area from one of the blogs I saw. This is so unique and fun and looks gorgeous in real life.
 The full card is beautiful. The Ribbon heart is inside the "Sweetheart" (120780) heart, stamped in Real Red classic ink. Then this was layered on the new luscious Glimmer Paper (121790) found on page 7 of the New Occasions Mini Catalog.
The card base is Real Red cardstock topped with several layers of the Blushing Bride Designers Series paper (117158). Each layer is punched using the Scallop Edge Border Punch (119882). The last treatment is the 5/8" Real Red Grosgrain Ribbon (109052) tied into a knot.
Give the ribbon technique a try on any open image, the trick is to overlap on larger items as though it's weaved. Post your samples too my website so I can see what you have designed.
Make it a Great Day!
Sunday, January 9, 2011
Vintage Valentine
Remember all the old valentines we used to see using all kinds of lace and things? It's been a 

long time since we've made or seen them like our grandmothers used to have.
I started out with Real Red Cardstock for the base and attached a sheet of Very Vanilla over that. Then using some Blushing Bride cardstock, I first ran it through the Big Shot using the Perfect Polka Dot embossing folder (117335). Then I inked up my Lots of Love Letterpress (120983) with Real Red Craft Ink and again ran it through the Big Shot impressing the Love image into the cardstock.
Then I stamped the girl image from Greeting Card Kids (120633) on Watercolor Paper using black StazOn ink. Using watercolor crayons, I colored the girl, then punch out using the Wide Oval Punch (1198590. I put sticky strip on the back edge, then attached some Victoria Crochet trim gathering it as I went around. I attached her with dimensionals. I stamped the "L is for Love" from the Grateful Greetings stamp set (116511) on Real Red cardstock then punched out with the Full Heart Punch (119883) sponged real read classic ink on the edges then used the distressing tool from the Cutter Kit and roughed up the edges. I punched two small holes at the bottom of the heart, then I stamped the "4 you " from the Tiny Tags set (118592) and a portion of the heart from the Sweetheart stamp set (120780) and stamped them on whisper white cardstock. Then I punched the words out with the Medium Jewelry Tag punch (117190), poked a hole through the top and threaded linen thread through the tag and the hole in the heart and attached to the card front using dimensionals.
Have a Wonderful Day
Saturday, January 8, 2011
Train Ride for Christmas
 We have had such a really fun Christmas this year. My son, Brent (in the plaid shirt and his girlfriend, Trish in the front with him) came from San Diego for Christmas. My daughter and her husband (Kim and Terry) stand behind. My husband and I decided for a fun Christmas gift to treat them all to a "whole day" of fun and the whole day was a surprise to them and they new nothing of what we were doing. The first thing we did was take them out to breakfast at a place that was next to a theater (thinking ahead)...... and then asked them all to drive in our truck and to leave their vehicle in the theater parking lot since the restaurant lot was too small to have them stay there all day (ha ha ha ). After breakfast, we still had time to kill before our next adventure so on the way to the next adventure (since it was noon) we stopped on the way there to have a beer since we couldn't be too early.
  The next stop was to ride a "vintage" train from Horseshoe Bend, ID up to a place between there and Cascade, ID. Usually there is some sort of entertainment but this time it was just a "Holiday Train" and the train was decorated for Christmas. This photo was taken for the mountain with the fog, but I liked that I also got the top of the train, which was special.
We took lots of pictures at the turn around spot. They had a whole set placed there with building fronts where we took more pictures, a bonfire, Santa's Workshop and a sleigh set up to take photos.


When it was time to board the train to go back home, we thought it would be fun to hang "off" the train and the pictures turned out really cool.


After our fun afternoon, we went home to have dinner then it was off to the movies to see "The Little Fockers". ha (and guess what, their vehicle was in that parking lot.... what a surprise) It was a long day and I think we all dropped into bed when we got home again.
What a fun Christmas.............. Looking forward to next year to see what we can come up with to top this year hmmmmmm..... any ideas?
Friday, January 7, 2011
Bitty Box Tags
 This is sooo cute in real life. I used my Bitty Box Die (115967) for the Big Shot and cut using the "Thick Window Sheets" (114324). The box is so sturdy and will withstand a lot of use.
You can tell more how sturdy this is by looking at the "open" box. How simple to die cut and fold together..... how convenient.
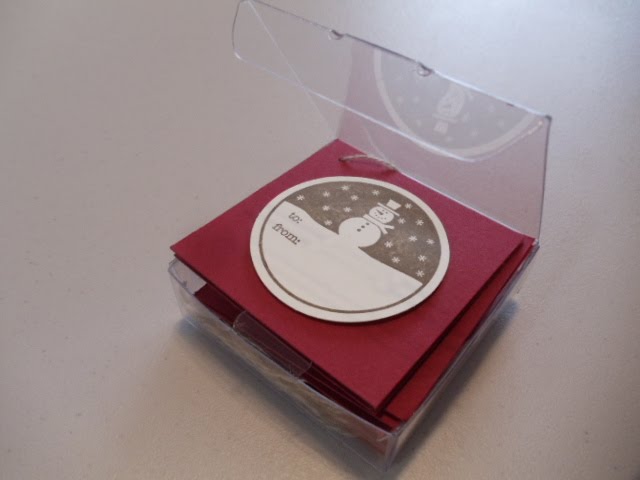
I made these cute Christmas Tags by cutting 2" squares. Then I stamped the Snowman Image from the Tags Till Christmas and punched out with the Circle Punch and attached with a couple of dimensionals. Then I punched a small hole in the top left corner and attached some Linen Thread to attach to a package.........
Instead of giving these away, I actually used the tags...... so now I guess I will have to make more and fill with Valentines tags.
Have a Great Day

Thursday, January 6, 2011
Build a Blossom Stamp Set & Punch
I haven't played around enough with this set yet and I partially cased the card in the Mini Catalog on page 12, but changed it to a 4 1/4 X 5 1/2 card so I added a few items. This stamp set from the new Occasions Mini Catalog has so many possibilities...... As I type this I'm thinking of some other fun ideas, so I will be putting them together and let you see what i envision. :)

The new Build a Blossom Stamp Set (121923 W or 121994 C) along with the new Blossom Petals Punch (121808) are so fun together. How nice not to have to snip around all the scallops on the petals (like we used to have to do..... whew!!) And boy do my customers like this option!
I used Baja Breeze and Early Espresso Cardstock for the base of the card and some of the Naturals Designer Series Paper. The flower was stamped with Blushing Bride Classic Ink on Whisper White cardstock. I stamped five of the petals with the pattern and 5 of the plain petals (the petals are different sizes and both use a different petal punch on the Blossom Petals Punch) s0000 fun. The petals are stamped with Always Artichoke onto Old Olive cardstock and punched out with the Blossom Petal Punch. I attached all to the Early Espresso cardstock using Tombo Multi Purpose glue. Then I stamped "4 you" from the Tiny Tags stamp set and punched it out with the Tiny Tags punch. After punching a hole at the top of the tag, I attached to an Olive Button tying in a bow and attached to the card with a mini glue dot. I then attached some sticky strip to the area between the cardstock and the designer series paper and "munched" some Always Artichoke Seam Binding across the tape.
Do you like???
Wednesday, January 5, 2011
Using the Fancy Favor Die Cut (115965) I made this cute little Luminary. I used the 2 1/2" circle punch to cut the circle in the middle of the cardstock. Then I attached a piece of Vellum on the inside that I had stamped with Black StazOn and then I only colored the leaves and berries with an Old Olive and Cherry Cobbler marker. I put one of the battery operated candles on the inside. I think this turned out really cute.

I think I will try some cute valentine ones for gifts for my friends. You can even put a package of candy on the inside along with the candle so you have two gifts in one!!! What's more fun than that????
Be sure to order your Fancy Favor Box die so you can make these for any occasion or for a gift sack with tissue paper or shredded paper. You can also add a handle to this box for a different look.
Try it out and use "your" imagination and let me see what you come up with.
Until later!
Tuesday, January 4, 2011
Woohoo !!!! The new Occasions Mini Catalog has come ALIVE!!!!!!
 !!!! The new Occasions Mini Catalog has come ALIVE!!!!!!
 The new OCCASIONS mini has some amazing new products and stamp sets; I've added some links to check out the catalog and the supplies used for the samples shown:
The following is one of the cards I made from the new Build A Blossom and also the new Blossom Punch.

To order your new supplies either email/call me or go to my Stampin' UP! website and click on "Shop Now" to order online. Your order will be shipped direct to your doorstep.
Make it a great day
Filled With Love Promotion
The Filled with Love Promotion is available for the period of 12-17-10 through 1-24-11. If you order this Stamp Set and the exclusive Love Patterns Designer Series paper pack you will also receive a package of FREE Itty Bitty Buttons valued for $4.95
If you order this Stamp Set and the exclusive Love Patterns Designer Series paper pack you will also receive a package of FREE Itty Bitty Buttons valued for $4.95The designer series papers are not available in any catalog; these are designed especially for Valentines Day through this promotion.....
Click on the image for more information and samples provided by Stampin' UP for your viewing.
Hurry to order your set for Valentines Day preparation!!
Sunday, January 2, 2011
I can't believe how long it's been since I've posted anything. Well, I'm back and will try to do much better. Christmas time is so busy at my house and even though it's all over, I'm going to show you a few things I did for Christmas, because I think they are super cute. One of my customers asked me to make some "Candy Wrapper" hostess gifts for a Christmas event she was in charge of. This box represents 125 Candy Wrappers. These are all different, and they hold little candy cane balls inside. I made these using the Candy Wrapper Die in the Holiday Mini Catalog on page 10 (remember the last day to order from this catalog is 1-3-11 - tomorrow before midnight). If you want to order this die, you can go to my website www.janetelam.stampinup.net and order online and it will be shipped to your doorstep.
This die is so fun for all occasions, birthdays, Christmas, Halloween and many other occasions. It can hold a small gift for that special someone.

This die is so fun for all occasions, birthdays, Christmas, Halloween and many other occasions. It can hold a small gift for that special someone.

I have some more fun things for you tomorrow, so STAY TUNED!!!!!
Make it a Good Day
Subscribe to:
Posts (Atom)