Tuesday, February 23, 2010

I love the Sweet Pea Designer Series Paper so much; it's so fun and cheerful and so many choices of colors, patterns. I'll be so sad when it's no longer available.
Anyway, some time back I made a box to hold 3X3 notecards that was so cute, I was thinking I had this really nice 4X4 card that we made at my last club and thought a box to hold four of them would be really cute. It wasn't hard to tweak the size of the box to fit the bigger cards.
The bottom of the box is an 8 1/2" square and scored at 2" all the way around. I cut tabs on each corner and using some sticky strip and snail I adhered the tabs to the sides all the way around.
The lid is a 5 5/8" square and scored at 1" all the way around. Again, you need to cut tabs on each corner, apply some sticky strip and adhesive and fold your lid together. Now you are ready to decorate any way you like. I used the Sweet Pea Designer Series papers and tied the lid down with the new 5/8" Chocolate Chip Satin Ribbon that's in the new Occasions Mini Catalog. These ribbons are only available until April 30th, so if you want some, now is the time or order it. There are 9 different colors and it's so gorgeous and fun to work with.
For the cards I used the Fresh Cut Notes (111882 on page 168 in the 2009/2010 Idea book & Catalog). I stamped a 4X4 piece of chocolate chip cardstock using the Fresh Cuts stamp set and used Craft White Ink ( you have to let this dry for a while as it stays wet for a while). I also punched out a flower from the Three for You punch, pierced a hole in the center of that and the center of the flower in the Fresh Cut Notecard and inserted one of the new Chocolate Epoxy Brads from the Occasions Catalog. Using the Eyelet Border Punch, I punched the edge of the Fresh Cute Notecard, then ran the front of the card through my Big Shot with the new Perfect Polka Dots empressions folder. Then I adhered the stamped chocolate chip piece to the inside of the Notecard and tied a piece of 5/8" Chocolate Chip Satin Ribbon around the card.
Isn't this so cute? What a fun gift for someone.

Monday, February 22, 2010

My Husband's Valentine

I saw the cutest Valentine someone made and I had to try it, but with the paper I used it looks sort of washed out. Basically it's a hinged card, but in the shape of a heart. This was fun to make, but I think if I did it again, I would do some things different. The little card inside the pocket says "Be Mine". Cute heh?

Sunday, February 21, 2010

Another Cake & Frosting Gift Set


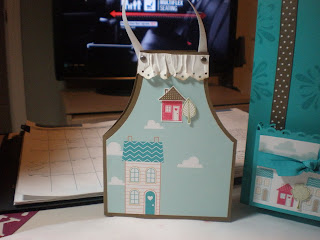
Yesterday, I showed you the Valentines Cake/Frosting Gift set. Today, I'm going to show you the set I made for my neighbor who moved into a new house. I decided it would be fun to use the new Welcome Neighbor Designer Series Paper you can get for free during Sale-A-Bration. This is a pad of 72 sheets of 6X6 double sided paper. There are 3 sheets of each design. I also used the new Good Neighbors stamp set from the Occasions Mini to embellish the apron card, and the front of the pocket. stamped and cut out some of the trees and added them to the paper raising them with dimensionals. Did you notice the lace on the apron? I punch the edge of a piece of whisper white cardstock using the eyelet border punch and sponged the edge with Soft Suede Classic ink. Then I sort of munched it up (is that a word), and after putting a strip of sticky strip on the card, I laid the lace on top and tried to scrunch it the best I could. I haven't actually given this to her yet; I hope she likes it. Nothing like a cake or cupcakes baked in your new home, right?

Saturday, February 20, 2010

Cake Mix Gift

I finally got around to trying out the Cake Mix & Frosting Gift set and have fallen in love with it. I've found that it's so versatile and can be used for ANY occasion. The ones I've seen up to now have all been for birthdays, but I made one for my daughter for Valentines Day that turned out really cute. I used some fun new products on this project and some old ones that I haven't used a lot. Don't you love the new Scallop Trim Edge Punch? It really dresses up a card. I also used the I (heart) Hearts stamp set from the Occasions Mini Catalog and punched them out using the Heart to Heart punch. I also had fun using the new Full Heart Punch and the new Embossed Heart from the Occasions Mini. I haven't used the Defining your Life and Defining Alphabet stamps much, but it worked well for this project.
Tomorrow I'll show you the set I made for my neighbor who moved into another subdivision into a new home.

Thursday, February 18, 2010

More My Digital Studio

I haven't spent nearly enough time learning My Digital Studio.... I'm not really a scrapbooker, but have wanted to do several and have a box full of photos, newspaper clippings etc. of my Grandson's high school football games. I don't know what it is, but I always feel so overwhelmed and feel like I don't know where to start.
When My Digital Studio came out last year, of course I bought my software right away then again felt intimidated. The more I have used it though, the more fun it is and not only can you do all sorts of digital scrapbooks, calendars, videos, etc. but you can also print out stamp images or even designer series papers to use on your cards or paper scrapbook pages. A while back I printed off some frogs that I put on a frame I made with a picture of one of my Pond Frogs. It turned out really cute, so I keep that at work to show others.
Tonight, I wanted to show a new stamper some things about what you can do with scrapbook pages using the new software and came up with this simple, but cute 5X5 scrapbook page to show her. This little boy's "kiss" is soooo cute.
Have a wonderful Friday!

Wednesday, February 10, 2010

Virtual Card Club


Do you love to stamp? Do you want to be part of a Monthly Stamping Club but don’t have the time to commit on a regular basis because of your child’s activities, your work or other time constraints? Maybe you are a shy stamper and feel uncomfortable stamping in group settings. Would you rather stamp at home in your pajamas at your own leisure when YOU FEEL like it? Then why not join my Virtual Card Club, using the supplies I have prepared, just as if you had come to my home. I need groups of 6 who will commit to 6 months with a $25.00 minimum catalog purchase each month. Tax and shipping must be charged on top of the minimum purchase to make it possible to earn free hostess products.

What I will supply are all Stampin’ UP! products:
Cardstock and designer series paper already cut to size for three different card projects.
Instructions and pictures for each project as well as a list of supplies and paper sizes.
Accessories (ribbons, brads, hardware, buttons, etc)
Already cut/embossed items using the Big Shot Machine
A “PUNCH CARD” which will be punched for every dollar of merchandise up to $300. When the card is full, I will send you a gift certificate for $20.00.

What I CANNOT supply are “Stamped Images” as it is against Stampin’ UP! Policy.

A week before the chosen date of the “Virtual” Club Night, I will post the supplies needed for each project. If you choose to use the stamp sets and accessories I have used, you can order them to complete your monthly project as part of your $25.00 minimum purchase for that month or you can use other stamp sets that you already own making the card your “own” and purchase other items that you can’t live without.

As a club member of 6, each of you will be hostess for one month qualifying you to receive free hostess sets, as well as a minimum of $15.00 free merchandise from the catalog all depending on the sales for that month. Usually the sales are higher than the $150.00 minimum for the free hostess merchandise and hostess stamp sets.

After I get together groups of 6, I will contact you for debit/credit card numbers so your orders can be placed at the end of each class….those of you who are the hostess for the month will be contacted for the additional free items you would like to add to your order.

If you ever feel you don’t understand how something is done or need additional help, please feel free to call me and I will be happy to walk you through it or send additional information to help you.


1. I would be delighted to be a part of the Virtual Stamp Club

Name________________________________________________
Address______________________________________________
______________________________________________
Phone________________________________________________
Email________________________________________________


2. I also have __________ friends who would like to be a Virtual Club Member with me.

Name___________________________Phone_______________________________
Name___________________________Phone________________________________


3. ________Instead of joining a VIRTUAL CLUB, I would like to put together a club for myself and 5 of my friends and come to your house so I can socialize one night a month and have fun WITH everyone. I understand either club works the same only I will have access to my demonstrators stamp sets to complete my projects.

4. I can’t join at this time but I would love to host a workshop in MY_____ YOUR____ home during Sale-A-Bration to take part in the free available stamp sets, papers, punches with each $50 purchase I make. I also understand that if my workshop is $300 or more I will receive another free Sale-A-Bration product. Each of my friends will also be eligible to receive a free Sale-A-Bration product for each $50 they spend. (Sale-A-Bration lasts through 3-31-10). As a “HOSTESS” of my workshop I’m eligible for all free hostess benefits.
--- --- --- --- --- --- --- --- --- ---- ---- ----

To hold a spot in either type of club, please contact me at your earliest convenience so everyone can be accommodated. We will have so much fun…… I also hold monthly Project workshops and will also be having monthly “themed” card classes (6 for $12.00)….. more information to follow:

Janet Elam
Stampin’ UP! Demonstrator
2059 So. Doe Creek Way
Boise, ID 83709
208-861-8336
twoelams@cableone.net
www.janetelam.stampinup.net
www.stampinmaniac.blogspot.com
Sunday, January 31, 2010

Not New but Oh So Cute!!!

I am so excited about the Mini Milk Carton Die Cut..... There are so many things you can create out of it other than milk cartons. I love birdhouses and there are a lot of other birdhouses shown in other blogs; but I haven't seen one with "EGGS" yet :) I'm actually waiting for the Easter season to get the little jelly bird eggs , but in the meantime I had some Malted Milk eggs I put in my house. I also have some nesting stuff, but it seems to have migrated to the bottom because you won't see any; there's lots in there, but the weight of the Malted Milk balls are holding them down.
Since the top has a roof on it, I made a place on the bottom of the milk carton to open to get the candy out. I used the Word Window Punch and the Horizontal Slot punch to make this happen. I did have to cut a little more than half of one of the bottom tabs to make this work.
My birdhouse is made with Barely Banana cardstock and I also used the Close to Cocoa cardstock for the roof after running it through the Big Shot using one of the texture plates. I punched a hole in the front of the birdhouse with the 1" circle punch and attached a piece of window sheet so I could fill it with candy.
I sponged some of the Soft Suede ink on the edges of the Barely Banana cardstock to give it some dimension and age and I also sponged chocolate chip ink on the Close to Cocoa roof for some highlighting. the bird and branch were cut from the NEW Extra Large Two-Step Bird punch (117191). The punch is soooo fun and versatile. I tried sponging some Pumpkin Pie ink on his belly so he would sort of look like a robin; not sure I accomplished that; anyway I don't think robins nest in birdhouses :)
I hope you all have an extraordinary Monday!!!