Thursday, February 19, 2009

Playing Around with Scrapbooking

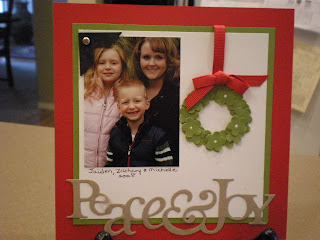
When I started preparing my "first" scrapbook pages I came up with these. The first one is of Christmas, but since it was after Christmas, I decided to save it for another time. My class is doing progressive pages, so they all start out with 6X6 pages, then to 8 1/2 X 11, then 12 X 12. These are only the 6X6 versions.

The next one I did, was so "pale" I thought that needed to wait until Spring or Summer, so I put it aside as well.
All in all, I think they are all cute and maybe I will have enough incentive to start some of my own projects. My grandson played football for all 4 years in High School. I have stuff saved from all that time to put together.
Of course I'm still stumped about all the newspaper clippings... it may turn out to be more like the "old fashioned" scrapbooks where things are just pasted in LOL. I also have pictures of his Graduation this last spring; but think that will come together pretty well. My other project is from when my husband had his foot run over at work by a heavy trailer. He's gone through months of surgeries, casts, crutches, therapy, etc. I have lots of pictures and even the pins and plate that came of his foot when it was sufficiently healed. I know that's not a scrapbook that most people will appreciate, but I was there for each appointment to document the process of healing; certainly a time to remember.


Wednesday, February 18, 2009

More Scrapbooking

Here's the masculine (at least sort of) scrapbook pages I did for my class this month. These are pictures of my son when he was in Costa Rica. Most of the pictures on the first page are him with some monkeys trying to get to his food. I don't know if these are Reses monkeys or some other type; I need to remember to ask him. If I remember right he told me one of them bit him too LOL.
I had to attach the Sock Monkey to my page, but my customers won't have that because I DOUBT they have monkeys in their photos they will be using.

I realized after looking at these now that I'm done there is absolutely NO stamping, just different designer series papers from Stamin' Up! and of course items cut from my Big Sot. I'm so loving that machine!!!! On these two pages, I used the flower on the first one that is an embosslit. The second page I used the Birds and Flowers Bigz Die and I also used the Simple Serif alphabet for the words. Have you had a chance to check out the specialty DSP??? It's heavy like cardstock. I love it a lot!
I'm so jealous that Brent gets to travel all over the world. He's been to so many countries but I only have pictures from a few of his adventures. Some of his travel is for his work, but lots of it is for surfing in different parts of the world, like Spain, Indonesia, Mexico and of course Costa Rica.

Monday, February 16, 2009

Scrapbooking

I have such good intentions about posting everyday, then I get sidetracked!!! I have lots of things I want to share.

The first thing today is a couple of scrapbook pages I did. I have never scrapbooked before even though I have several projects that I want to do. I challenged myself and offered a scrapbook class to my customers, so now maybe I can overcome my fear of it having to be so personal; because that's how I view scrapbooking. It's hard for me to come up with pages that will make other people happy and want to use them or make them so impersonal I don't want to use them. It seems like such a hard line to follow. Anyway I wanted to share what I did last month using my daughter as the focal point. I ran out of good pictures, so there are some blank spaces to add a few more to each page. Let me know what you think.
Tomorrow I will share what I did for this month, using my son and trying to make it more masculine.

Thursday, February 12, 2009

Book Marks

When I was at the Stampin' Up! convention last year, we made a bookmark out of chipboard and ribbon and some of the new Designer Brads and Filigrees. The one with the Pacific Point 5/8" striped ribbon is the one we made there.


Last weekend at our local "Demo Day" one of the girls showed us how she made a bookmark out of punched circles and pearls and things from our "Pretties Kit". So I had to try it, didn't it turn out cute. I cut 10 circles out of Designer Series Paper using my 1/2" punch. Then I folded each circle in half with the side you want to show on the inside of the fold. Then using the Tombo Multi-Glue, I glued the outside 1/2 edge to another one and the same to each of the ten circles until they were in a bead shape. Using my Silver Stretchy cord, I tied a knot at the bottom (a pretty good sized one because I didn't want the beads to come off) and threaded some pearls, bead spacers and some of the clear beads on, then my paper bead and then I matched the pattern on the other side with the pearls and clear beads. Then I tied another knot so they wouldn't slip around. To actually finish this off, tie free end of the cord up close to the beads and then cut off any extra cord. The bookmark stretches around your book to slip into the pages and it stays without falling out too. Then I decided to try to make ones like we did in convention. I found a chipboard flower in my stash and colored it using my Cameo Coral Craft Pad. Then I cut out a flower using my Big Shot, some chipboard that Stampin' Up! sells and used the Build a Flower die. I also cut the flower out again with my Big Shot, this time using some Designer Series paper and glued them together. Then with my crop-a-dile, I punched a hole in the center and pushed one of my Rhinstone brads through and spread the leg apart. To finish, on the back I cut out one of the smaller scallops using my Big Shot and the Scallop Circle 2 die. I adhered this scallop to the back of my chipboard piece using sticky strip as I wante to make sure it stayed together. Then I took my 5/8" ribbon and put some small pieces of sticky strip on both sides at the top and adhered it to the back of the scallop piece. Then cutting another scallop, I adhered it over the top of the ribbon matching the underneath scallop (using sticky strip). At the bottom of the ribbon, I didn't have any of the Designer Brads, so I used the little round piece out of the Hodge Podge Hardware kit and threaded it on for some weight. I wasn't really proud of that bookmark so I decided to try something a little different.
I found a square piece of chipboard that had a little "flower" that punched out, so I thought that might be cute with some bright paper underneath showing it off. I sponged on Old Olive craft ink, then I picked out three different sizes of silk flowers from my Pretties Kit and threaded a pearl through the center of them using a piece of silver cord. I adhered the flowers to the chipboard using Mini Glue Dots. The back of the chipboard and he ribbon were done the same as with the flower. This one is better, but I think I need to play with them more to come up with something "perfect".

Tuesday, February 10, 2009

My Fish & Frog Friends

One of my friends showed me a fish bowl she found at Michaels a while back, and of course you know, I HAD TO HAVE ONE TOO!!!!! Don't you just love it? It's shaped like a big fish and stands on it's fins. We originally had just a "huge" vase with a plant on top but this is soooo much cuter. I also decided to add a couple of the little frogs; things were fine while the frogs were "tiny", but I think I over fed them because they got so much bigger and fatter.... well, wouldn't you know, the frogs started "stalking and beating up on my beta" so I had to put them in time-out in their own bowl. Can you see them? The top one was watching me take his picture LOL. Their bowls sit side by side on the counter and when I'm not looking they're probably sticking their tongues out at each other..... do fish have tongues? Anyway, they are so cute, I just had to share.